

Expanding Turkish textile market presence – with ColorCo. Global

A successful summer 2026 in the Turkish textile market with milestone expansion through our Istanbul based partners at ColorCo. Global.

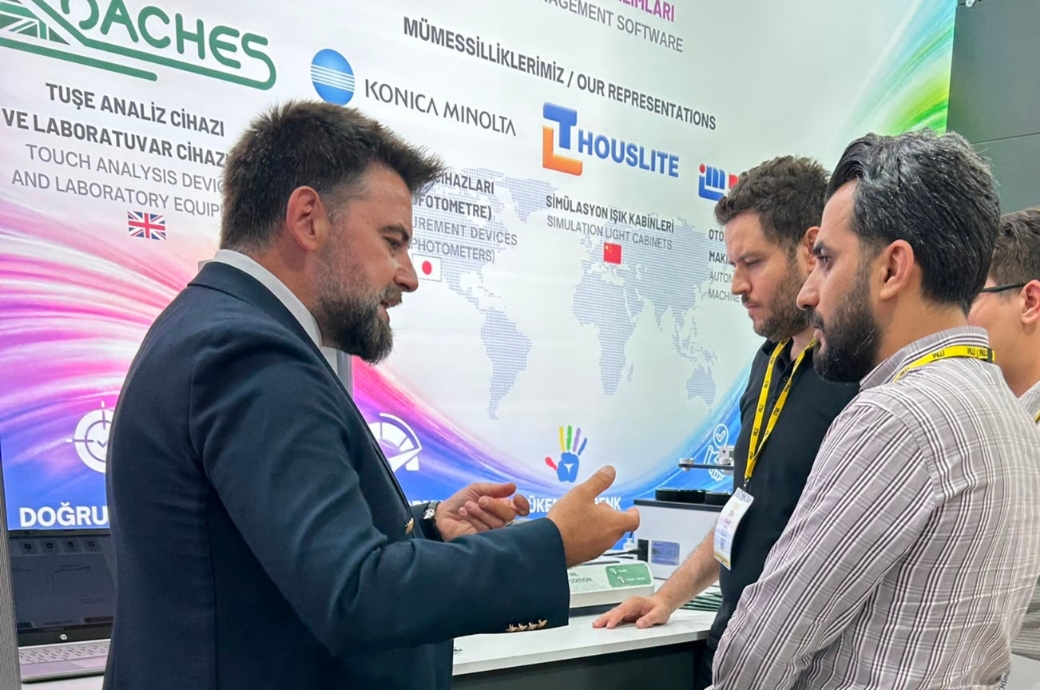
Roaches International is continuing to strengthen its presence in one of the world’s most significant textile manufacturing regions through its growing partnership with Istanbul-based ColorCo. Global. Since establishing a partnership as Roaches’ Turkish representatives in late 2025, the company has rapidly expanded its textile market presence through increased digital promotion of Roaches equipment, a prominent appearance at this year’s ITM exhibition in Istanbul, and a brand-new testing suite.

As well-established experts in colour measurement and management, the ColorCo. Global team, led by Soner Duransel, have been focused heavily on building technical visibility and confidence within their expanding textile network.

Türkiye is a key hub within the global textile and apparel supply chain, serving an extensive number of major domestic manufacturers and international brands. As quality requirements become ever more stringent, demand for testing equipment and comprehensive technical expertise remain a high priority for textile producers operating throughout the region.

As part of their commitment to the regional market, ColorCo. Global has established a dedicated textile testing suite at their Istanbul facility, providing their customers the opportunity to experience equipment in operation and explore testing solutions firsthand, without having to wait for a major exhibition.

The facility enables live machine demonstrations, technical discussions, and fabric evaluations, whilst creating an accessible environment where textile manufacturers and specialists can gain a deeper understanding of modern textile testing equipment face-to-face. More than a dozen visitors and testing projects have already passed through the lab since opening, demonstrating the value of having a permanent technical resource outside of the exhibition calendar.

“ColorCo. Global has built exceptional momentum in a relatively short time-span”

The testing suite currently houses a selection of our key textile testing instruments, including the Sentire Fabric Handle Tester, with regular demonstrations and introductory testing being conducted for prospects across Türkiye. The facility has been designed to provide technical support in both standard physical textile testing, such as abrasion and pilling testing, as well as more advanced fabric hand feel testing, topics of which are all relevant across the entire scope of the textile industry.

Their broadening profile was showcased at ITM 2026, one of the textile industry’s most significant international exhibitions. The event provided an invaluable platform for engaging directly with manufacturers, testing laboratories, and technical textile specialists from across Türkiye, as well as visitors from neighbouring regions throughout Europe, North Africa, and West Asia.

“Their investment in developing a local textile test-suite solidifies the clear commitment to providing leading technical expertise and high-quality testing solutions. The advances they have made since joining our international partner network reinforce how integral their work is to the Turkish textile market.” – Rob Shelton, International Business Development Manager.

While the presence at ITM remains a key milestone in their expansion into the regional textile market, the development of this permanent testing suite allows those conversations to continue and develop long after this years ITM 2026 has wrapped.

3 Minute Methods: Colour Fastness Testing – ISO 105 E Series

3 Minute Methods textile testing methods made easy header image

ISO 105 E Series Wet Colour Fastness Testing

Welcome to 3 Minute Methods, where we teach you a fundamental method in textiles testing, in just 3 minutes

Introduction

Wet colour fastness tests on textile materials are viewed as a standard requirement for almost all textile garments and products, due to the frequency of their exposure to a range of wet conditions during use. A beach towel for instance is exposed regularly to seawater, a sportswear garment to perspiration, and swimwear to chlorinated pool water.

How ‘fast’ or ‘secure’ the colour is in these textile products is what we are gauging, and it is the 105 E Series that we are focusing on in this 3 Minute Methods.

Perspirometer for ISO 105 E01 E04 testing
Perspirometer and Memmert incubator oven

What does the test consist of?

All four methods are testing with the aim of assessment, which includes:
• Colour change of the specimen
• Staining onto adjacent fabrics

Whilst we are testing to assess very much the same end points, the processes differ slightly between the tests, with the main outlier being the E03 method for testing chlorinated water.

All of these tests need a specimen to test, a Multifibre or other adjacent fabric, a solution to test in, a Perspirometer, an incubation/agitation period, and Grey Scales and D65 lighting for assessment.

ISO 105-E01

Colour Fastness to Water (Deionised water)

ISO 105-E02

Colour Fastness to Seawater (Saline/ Saltwater)

ISO 105-E03

Colour Fastness to Pool Water (Chlorinated water)

ISO 105-E04

Colour Fastness to Perspiration (Simulated sweat solution)

SDC Multifibre cloth for ISO 105 colour fastness testing

How are the E01, E02, and E03 tests performed?

The process of performing these three tests is best explained in a series of steps:

Step 1. Prepare the specimens

The specimens for each of the three tests is a rectangle of 40mm wide x 100mm in height, with a strip of Multifibre adjacent fabric prepared in the same dimensions, and sewn along the shorter edge. The E03 is typically tested on it’s own.

Step 2. Make/ prepare the solution

For E01, this is simply deionised water. For E02, this is an aqueous solution with a ratio of 30g/l of sodium chloride (salt) to dionised water. The E04 perspiration solution is split into two liquors, one acid, and the other alkaline. These acid and alkaline solutions must be made fresh in the lab that is performing the testing, as this test is sensetive to the exact pH of each liquor.

Step 3. Soak the specimens

The specimens must each be in their own soaking bath, and ‘thoroughly wetted’ in the required solution. E01 and E02 require no extended soaking time as per the standard, but the E04 requires half an hour of soaking in the perspiration. NOTE: air bubbles must be removed straight away, using a small glass plate, tapping out the bubbles to ensure the specimen is totally wetted through.

Step 4. Drain and apply pressure

When the soaking is complete, remove the specimens and remove excess water, and load into the perspirometer between two glass or acrylic plates. When the Perspirometer is loaded the top weight must be applied, and the rig is then secured to maintain an even pressure for the next part of the test.

Step 5. Oven/ incubate the specimens

The Perspirometer containing the specimens is now placed in an incubator oven, which is set at a constant 37° to replicate the temperature of the human body, and this is for a total of 4 hours.

Step 6. Remove and dry the specimens

The specimens can now be removed, and must be opened out from the adjacent fabric by the sewn edge, and hung to line dry with the only parts touching here being the line itself and the stitched seam of the specimen.

Step 7. Assess

After the specimens have had time to dry fully (in ambient heat not exceeding 50°) we can move onto assessment. Using a lightbox with standard D65 lighting, and using Grey Scales, we assess for both the staining and shade change of the specimens, in accordance to the standard. 

The difference in testing procedure between these three and the E03 method is that the chlorinated water specimens are to be tested using a stainless steel vessel such as those used for Washtec, where the solution and specimen are enclosed in darkness and set through the rotating wash bath for 1 hour.

When the test has completed, the specimen is hung to dry and assessed for shade change (as no adjacent fabric is present here).

Assessing the staining and shade change

The two-stage assessment is performed under standard daylight conditions, known as D65 lighting, with a pair of Grey Scales, one used for the staining of adjacent fabrics, and one or shade change of the specimen itself.

The staining part of the assessment is assessing for the transfer of dyes to the Multifibre or adjacent fabric, and its respective fibre types. Each of the 6 fibre types on the tested Multifibre must be graded against an untested strip, and in reference to how strong the staining is on the 1-5 scale, with half grades being acceptable.

The shade change assessment is also a 1-5 scale, however it is noted as 1 = severe change, and 5 = no change, and the specimen must lie somewhere on this scale, when compared to an untested strip of the same specimen.

Quick takeaway

The 105 E Series provides a simple and highly effective way of performing wet textile colour fastness testing, performed in almost every lab around the world. This testing makes up a fundamental starting point for testing and assessing the colour quality of textile garments and products, helping manufacturers and retailers deliver products that perform as expected with everyday use.

For more information on the Perspirometer and the available ranges of Test Materials, visit the website

3 Minute Methods: Print Durability Testing with Durawash

3 Minute Methods textile testing methods made easy header image

Print durability testing

Welcome to 3 Minute Methods, where we teach you a fundamental method in textiles testing, in just 3 minutes

What is print durability?

Printed textiles face unique durability challenges in everyday use. Unlike dyed fabrics, where colour is absorbed into the fibre, most textile prints, specifically pigment prints, sit on the surface of the material. This placement makes them vulnerable to external stresses, particularly during laundering where washing, rinsing and drying place significant physical and chemical agitation on the printed area.

To be able to validate the quality of a pigment printed textile product, we test the item for it’s print durability to washing, using an accelerated wash tester, such as the Roaches Durawash.

Roaches green printed sports shirt

What does the test consist of?

This test is measuring the effects that laundering has on pigment printed textiles and garments, replicating home washing conditions in accordance to product care labels. Samples are laundered as part of a controlled wash load, using standardised detergent and (hard) tap water, and temperature set at 10oc higher than stated on the products care instructions.

A crucial element of this test is that the specimens are not washed in isolation, nor are they all ‘bundled together’ in the drum, as often seen in a domestic setting. This highly variable area of a wash test is controlled by the addition of fabric makeweights. These makeweights introduce a standardised agitator which replicates a similar action to that of a domestic washing load, a ‘test material’ which offers repeatability across all wash tests. This agitation is a major contributing factor to what often reveals weak print adhesion.

The application of heat and tumble drying introduce additional agitation to the process. The heat and movement during drying can further stress printed areas and expose issues which may not be visible when items are line dried.

Print durability to wash testing in 4 steps graphic

What is the test process?

The test is performed in a few simple steps. Firstly, the printed item is washed in an accelerated wash tester, such as Durawash. Then, a suitable reference detergent is added, the items are washed, spun dried, before being tumble dried and eventually assessed in a light cabinet with standard D65 lighting.

Depending on the size and type of print or label, the test specimen preparation varies.

Smaller prints in early rounds of testing are often sewn to the makeweights, and in final round testing, full garments are tested, however with every specimen being tested, there must be an untested print sample used for assessment. Exact specimen preparation should be followed as per the standard and method that you are using, which can differ, so it is important to study the standard beforehand to be sure.

The testing process varies only minimally between standards, but the fundamental elements such as the washer, the detergent, the heat, the spinning, and the drying, all remain the foundation to performing a print durability test.

There are only a small number of commonly used standards that include print durability, including:

  • M&S C15 Print Durability
  • NEXT TM8 Appearance for Garments and Products
  • Arcadia Group CA 10a Print Durability for Textiles

For more information on testing standards, get in touch with the Roaches team who can give further advice.

Durawash control panel with time temperature and start button

Assessing the print performance

The assessment process is done predominantly by the naked eye, and focuses on aspects such as colour change, wrinkling, cracking, and delamination, as well as overall physical appearance of the specimen, such as creasing and seam degeneration etc. For the print specifically, we are looking for areas that show signs of wear, right up to any delamination of the pigment.

Where changes are observed, additional checks are to be carried out to confirm whether the effect is due to a true sign of wear to the print, or whether the visual change is due to the OBA (optical brightening agent), if used, which can be picked up during washing, potentially altering the appearance of the print. This distinction matters, and the use of a flouresence supressor is needed here to ensure the correct assessment is made.

A durable pigment print should show minimal to no visible change when directly compared to the unwashed reference. Edges should remain sharp, showing no signs of delamination, and the design and coverage remaining in tact. Minor changes may be acceptable, depending on the end use of the product, but this is often to be decided by the retailer or brand that is distributing the product.

White durability wash testing with Durawash

Why is this test important?

It is crucial to follow these steps as per the standard you are using, regardless of the care label instructions, as they are designed to offer the harshest domestic laundering conditions, should care label instructions be overlooked by the consumer.

Durablity testing allows potential quality issues to be identified early in the manufacturing process, helping brands and retailers avoid costly bottlenecks, complaints, and eventual reputational damage. This type of testing also helps to solidify confidence in the quality of the product overall, from the fabric to the construction of the item.

Quick takeaway

We are seeing this type of testing becoming ever more popular between brands & retailers, and testing houses, and we expect it to continue rising in popularity.

For more information on Durawash, visit the product page and download the brochure, or visit our news page and explore the history of accelerated laundering testing.

Accelerated wash testing: A Durawash case study

White durability wash testing with Durawash

Accelerated wash testing: A Durawash Case Study

This case study covers the history of accelerated wash durability testing, how the Durawash was created to fill a gap in this area of textile testing, and why it is still just as prevalent as ever in the textile industry today.

An introduction

Originally developed to meet the growing need for accelerated laundering tests, the Durawash became the very first project brought forward to reliably simulate garment washing durability in a laboratory environment. Long before accelerated testing became a popular requirement, the foundations of this washer were being laid with major British retailer Marks & Spencer, a direct collaboration that still sets this machine apart today.

Many people ask, ‘what is an accelerated wash test?‘, ‘why do we need to test the wash durability of garments?’ and ‘how does accelerated wash testing compare to domestic laundering?’. 

This internal case study explores where the Durawash came from, what accelerated laundering testing is, and why it matters more than ever, and also how this lab testing machine continues to meet the demands of today’s fashion and textile industry.

Durawash stainless steel impellor
Mixed garments being washed with detergent

Why do we need accelerated wash testing?

Washing can be one of the most damaging processes that a textile or garment will face in its lifetime. Mechanical agitation, heightened temperatures, chemicals, water, and other load items, all combine to affect the product in a variety of ways, the main three being:

• Print and embellishment/ attachment durability
• Surface appearance, including the quality of feel
• Structural integrity of seams, pockets, zips and other components

These three become our points of assessment, they are the main areas where we as the consumer see a breakdown in quality the earliest/ most visible. Garments and textile products are assessed for their appearance after washing, and typically graded between a 5 point descriptive grading scale, from no change, up to distinct or complete change/ degradation for that point of assessment. Definitions vary between standards, so it is important to be specific to the standard being used to perform and assess your test.

Garment wash durability test method in 4 steps

Traditional consumer laundering can take weeks of wear and washing to reveal effects in these areas, so for brands and manufacturers, testing products in real-time this way is simply impractical in terms of timings and cost.

To combat this issue, accelerated wash tests were developed, with the aim of compressing multiple wash cycles into a shorter, more intense wash. An accelerated wash test takes 15 minutes (according to test method M&S P5), and delivers equivalent results to that of 5 full domestic wash cycles in a standard washing machine (based on the Wascator FOM71 CLS). The vigorous and continuous mechanical action produced by the impellor is the main driver of this test being accelerated beyond a standard domestic wash.

By condensing this test, it has allowed testing labs the ability to better predict the performance of a textile product before the point of sale, without ultra-long lead times and consistent high energy consumption.

Original Durawash controls

How it all started

The Hoovermatic Twin Tub washing machine came first, and was chosen initially to test the security of attachments and embellishments, such as sequins, buttons, and bows. This choice was due to its vigorous mechanical action which delivered consistent agitation. The test was performed for only 30 seconds, as this was thought to be long enough in this washer to test the security of these more delicate attachments. Further tests were then developed and this washer became accepted more widely for testing print and garment durability. 

Over time, certain retailers, the first and most notable being Marks & Spencer, began to base internal durability methods around the action of this particular machine. The mechanical conditions proved highly effective in identifying quality issues with laminated and pigment prints, as well the integrity of pleats, waddings, and other types of surface finishes.

There were several small but key drawbacks with this machine in its current capacity, which included the need for:

• Repeatable laboratory controls/ operating features.
• Safety features suitable for laboratory testing environments
• Calibrative components to ensure consistency and compliance.

By the late 1980’s there was a decreasing call for this type of washer in a domestic setting, and by the early 1990’s the Twin Tub was no longer available on the market. During this period, there was a distinct gap available here between having a useful test method and set-up, a system that worked, and there being a reliable, scalable item of laboratory testing equipment.

The development of the Durawash

With the adapted Twin Tub model becoming only a temporary soluiton, the prototype of the Roaches Durawash began. Major characteristics of the original Twin Tub model were retained in this new design, the wash tub dimensions and impellor speed being two of the crucial elements to keep the same.

Roaches brought in the addition of more updated engineering and build materials, creating the whole model from stainless steel so that the machine highlighted longevity in a wet testing laboratory, an environment prone to rusting. Also installed was a fit-for-purpose safety system, and comprehensive process controls, to enable all laboratory technicians the ability to use the machine safely, and repeatably, no matter who was using it.

Through the years the design has been refined, with the outer shell and touch screen control panel updated to improve the useability features of the Durawash, so that it is easier to use, and more appealing in a laboratory setting. The look and feel of this washer today is aligned precisely with the Roaches brand to give it a recognisable identity of it’s own.

Durawash controls on original model
New Durawash render

Solidifying the Durawash into industry standards

One unusual element to the adoption of the Durawash into commercial brands and laboratories was the direct reference by name in accelerated wash testing standards. The first standard that integrated the Durawash into its method by name was Marks & Spencer, who went on to define one of the most widely used print durability to washing tests in the industry.

Historically, standards typically define the mechanism and conditions of how a particular test should be performed, but don’t mention manufacturers or specific models. These named references are rare, and usually reflect industry-wide acceptance and confidence of a particular machine, something that the Durawash brought immediately, as the very first designed-for-lab durability to washing tester.

There are now a host of durability to washing test methods available that use the Durawash, from both retailers and standards institutes such as M&S, British Standards Institute, NEXT and more. This chart below details some of the most frequently performed tests.

Test methodTest name
M&S C15Print Durability
M&S P5Durability Wash for Garments and Components
M&S P6Durability Wash for Pleat Retention
M&S P7Durability of Waddings and Quilted Waddings to Washing
M&S P69Cockling
NEXT TM 8Appearance of Garments and Products
CEN TR 16792:2014 (Annex C)Safety of Children’s Clothing

Accelerated wash testing today - Why it still matters

Far from being obsolete or even uncommon in today’s test labs, accelerated wash durability testing is in fact an even more universally discussed topic. Textile products in the current climate have far more performance criteria to meet, than expected in the past.

Garments and products today involve:

• Fibres manufactured and constructions designed to maintain durability
• More complex prints, surface embellishments, and finishes
• Treatments to provide additional and/or specific performance qualities
• Increased sustainability pressures between manufacturer and consumer

Retailers expect there to be sufficient proof that garments and textile products can survive repeated consumer laundering, without excessive colour loss or transfer, print degradation, or change in appearance and feel. Accelerated wash testing allows this to be demonstrated early, which can reduce costly recalls, customer complaints, and ultimately reputational damage.

In an industry motivated heavily by speed, accountability, and more so than ever sustainability, the original principle of the Durawash, predictable acceleration that still reflects real life use, is arguably even more valuable and topical than when it was first developed over 30 years ago.


Explore the Durawash

Explore the Durawash and Durawash Plus

Take a closer look at the standards tested by Durawash, and the test materials used in durability to wash testing.

durawash print durability tester

Upcoming events: Where you can find us this April

Upcoming events header gif Roaches

Upcoming events: Where you can find us this April

With so many key events in the technical textile calendar, we want to let you know where you will be able to find us, and when.

International events

Indo Intertex Jakarta – 15th-18th April

Indo Intertex is one of the most significant textile garment and machinery exhibitions in Southeast Asia, and this is the first time we are exhibiting here, hosted by our regional parters at PT. Kawan Era Baru. 

On their stand will be several Roaches testing machines, including Martindale, Durawash, and Crocktec, as well as other machines and showcases represented by the team. 

Find the PT. Kawan Era Baru team in Hall A1, at Booth F1.

Indo Intertex jakarta Roaches 2026

Techtextil Frankfurt (Texprocess) – 21st-24th April

The leading technical textile and machinery exhibition is coming soon to the halls of Messe Frankfurt, and this year we are exhibiting with our Sentire Fabric Handle Tester there in person, for live demonstrations. We are being hosted by our German partners at Elmatex GmbH, on their pavillion. At Techtextil, as usual, will be a series of networking events, which provide perfect opportunities to reconnect with key voices in the industry, as well as make new contacts and introduce new members of our own team.

Find the Elmatex Pavillion in Hall 12, near the entrance to the hall.

Bianco exhibition Europe Roaches

Events in the UK

Fashion-Textiles-Wearables Conference – 13th-15th April

This 3-day event brings together some of the leading minds in textile technology, design, and development, from the world’s leading institutions and industry specialists. With a whole host of presentations on specialist topics, this event has something interesting for anyone in the textiles and materials development industry.
 
We are exhibiting at the FTW Conference, and we are also delivering a presentation on innovation in infrared yarn coating technologies, one of our latest development projects we have undertaken here at Roaches. This presentation is on the first day of the conference, and will be delivered by our Development Engineer, Liam O’Neill.
 
For more information and the event programme, visit the event page.
FTW conference 2025 Manchester

Leicester Made & Regions – 24th April

Leicester Made has been a recurring event for a number of years now, however this year it has opened up to the textile industry outside of Leicester to include other regions of the UK who want to get involved in this growing event.

We are excited to be exhibiting at this years event, with a booth dedicated to showcasing Sentire, our Fabric Handle Tester, where we will be providing live demonstrations throughout the day.

For more information and registration, visit the event page.
Leicester Made 2025 Panel

3 Minute Methods: Box pilling vs Random tumble piling

3 Minute Methods textile testing methods made easy header image

Box pilling vs Random tumble pilling

Welcome to 3 Minute Methods, where we aim to teach you a fundamental method in textiles testing, in that’s right, just 3 minutes.

What are they?

Pilling is one of the most visible signs of wear for a garment or textile product. When it comes to testing fabrics for their propensity to pilling, we need to understand that the behaviour of pilling varies largely between fibre types, yarns, and fabric constructions. Selecting the correct pilling test method is essential to be able to give the most accurate, realistic indication as to the durability of the product.

There are three widely used lab testing methods (we covered the Martindale Pilling method 12945-2 in a previous 3 Minute Methods article), but the two we are focusing on for this article are:

Both of these methods provide an accelleration of surface wear, but they do so in different ways.

Random tumble pilling tester roaches

How do the tests work?

ISO 12945-1: Pilling box method

Known as ICI box pilling, the stages involved in this test are better understood step-by-step:

  • 4 x 140mm square samples of fabric are folded in half and sewn along one edge, then turned inside-out into ‘tubes’
  • Specimens are mounted onto polyeurethane pilling tubes and taped at both ends
  • Prepared specimens are placed into a cork lined box
  • Box rotates with specimens inside for a set number of revolutions, at a set speed
  • Once completed, the specimens are removed, and assessed in a light cabinet against photgraphic standards

The test itself is relatively gentle in terms of tumbling environment, when compared with it’s counterparts within the 12945 standard, and the cork lining of the box provides a low-aggression abrasion against the fabric of the specimens.

ISO 12945-3: Random tumble pilling method

The Random tumble method has fewer steps, with less specimen preparation beforehand. Much like the parts 1 & 2, part 3 also requires 4 specimens, but these are cut in squares of 105mm, and the 4 edges glued to prevent fraying. When the glue is set (min of 2hrs), and the appropriate chamber liner applied, the test can commence.

The test requires either a polychloroprene or cork liner as the abrasive surface in the test chamber, with the addition of spinning impellers in the middle of each chamber, which agitate the specimen.

This test is considered to provide a higher-energy, more ‘wear-like’ action to the specimens, and can be assessed for not only pilling and fuzzing, but also matting on certain fabrics, as well.

ICI polyurethane pilling test tubes
Random tumble pilling tester pink fabric roaches

What are the key differences?

There are key differences between these two methods of pilling, and though they are both designed to achieve very similar results, it is important to understand what is different, and why. This table below lists very plainly, what these differences are.

Test methodTest name
M&S C15Print Durability
M&S P5Durability Wash for Garments and Components
M&S P6Durability Wash for Pleat Retention
M&S P7Durability of Waddings and Quilted Waddings to Washing
M&S P69Cockling
NEXT TM 8Appearance of Garments and Products
CEN TR 16792:2014 (Annex C)Safety of Children’s Clothing

The principle of agitating textile specimens to measure their propensity to pilling, is very similar between these two tests, but the main differentiating factor, aside from the specimens themselves, is the shape of the chamber and the action that occurs inside.

Which test should you choose?

To be able to decide between any 3 of the methods in the 12945 standard, but in particular part 1 & 3, it should be based on what type of fabric or garment is being tested.

Typically, the part 1 box pilling method is chosen for woven fabrics, products in the categories of shirting, suiting, non-stretch materials, and fabrics that can be prone to seam distortion. These fabrics benefit from the structure of the sewing and application to the polyurethane tubes, to give a more uniform spread of pilling across the surface.

The part 3 of this standard is aimed predominantly at knits such as jersey and also heavier gauge knitwear, as well as fleeces, pile fabrics and napped fabrics as well. Take a clothing brand for instance, the random tumble pilling method can more closely emulate how a jumper or other knitted garment behaves during use.

It is important to note here however, that both methods are universally accepted, and there is no ‘preferred’ test between the part 1 & part 3. Choice comes down to merely which would be more appropriate, based on the test fabric specification.

Photographic standards pilling Roaches

Quick takeaway

These two parts of the 12945 pilling standard are by far the most commonly performed tests, moreso even than the traditional 12945-2 Martindale pilling test. We are seeing a large increase in this type of testing, so having a basic understanding of fibres and fabrics helps to be able to build a testing schedule, and decide which of these tests are most relevant to follow.

For more information on ICI box pilling, and Random tumble pilling, visit their respective product pages and download the brochure.

Service case study: The engineers behind Roaches reliability

service case study header image Roaches

Service case study: The engineers behind Roaches reliabilty

This case study offers a brief look at how our service and calibration segment has grown from being the foundation of our company, into one of the strongest, and most recognisable segments of the Roaches brand.

Introduction

The textile and materials producing industries rely on a huge variety of highly specialised machinery and equipment. From dye baths to finishing machines, testing instruments, and autoclave systems, throughout every process, the accuracy and reliability of these machines are crucial. We manufacture machinery for all of these sectors, and while our equipment is designed for longevity, it’s the Roaches service team that keeps laboratories, Universities, and production environments running at a consistent high quality.

The foundation of Advanced Dyeing Solutions Ltd (our parent company) rose from an industry need for machine servicing. The equipment in the market needed expert care from the right engineers. Our commitment to long-term customer support is just as important to us today, as it has been for the past 25 years.

Roaches service team edited

What our service team does

A Roaches machine service involves far more than simply a check over, it is a full and in depth health assessment of the equipment, and it consists of several key components:

  • Mechanical and electrical diagnostics
  • Replacing worn parts and correcting hardware issues
  • Cleaning, fluid or lubricant replacement
  • Preventative action, including recommended upgrades or component refreshes
  • Calibration

Calibration is a separate, yet equally critical pillar of our ongoing support. While servicing ensures equipment health, calibration ensures equipment accuracy.

Regular calibration is vital because it verifies that results remain reliable and trusted, and for testing specifically, it helps customers meet standards from numerous international accrediting bodies (such as ISO and AATCC), and it supports audit compliance and ongoing certification requirements.

Roaches calibration includes:

  • Diagnostic testing and analysis
  • Calibrating mechanical and digital components, such as the Martindale Lissajous
  • Producing audit-ready reporting and results

Our approach to both servicing and calibration ensures not only that machines are kept running at peak performance, but also that future issues are actively prevented.


“As a senior service engineer, my team ensures that every installation, calibration, and repair we perform keeps our clients' production lines running and their laboratory testing accurate, ultimately protecting their investment and preventing costly downtime."
Ben Seanor Service engineer
Ben Seanor
Senior Service Engineer

Why our customers choose a Roaches service

Roaches engineers bring years of expertise in mechanical engineering, with involvement from the initial machine build, to the maintenance and replacement of components. Many of the machines in customer facilities today have, at some point, been worked on by our service team after installation.

There is a lot for customers to gain from our service, such as:

  • Knowledge from engineers who understand both the equipment and the process behind using it
  • Faster diagnostics due to shared product expertise
  • Worldwide serviceability for all Roaches equipment
  • Confidence that their testing or production environment is compliant, safe, and accurate

Another reason that Roaches engineers are so unique in this field, is that they have such a wide range of expertise throughout the industry’s processes. Our engineers have seen many machines, and many iterations of similar products over the years, so even if a customer requires assistance with a non-Roaches product, our engineers are knowledgeable and confident enough to still provide machine servicing.

Roaches International service partners indonesia thailand sri lanka india
Roaches engineering welding and wiring components

An insight from Ben

As our primary travelling engineer, Ben has become a familiar face across customer sites throughout Europe and beyond, often supporting multiple machines and systems, and even entire labs in a single visit.

“As a senior service engineer, my team ensures that every installation, calibration, and repair we perform keeps our clients’ production lines running and their laboratory testing accurate, ultimately protecting their investment and preventing costly downtime. 

We travel constantly, adapting to different cultures and factory conditions around the world, whether that means troubleshooting under pressure in a chaotic environment or building rapport over a client dinner.

When we cannot be there in person, we rely on a network of local partner engineers, acting as their remote support and quality control to ensure our standards are met everywhere.” – Ben Seanor, Senior Service Engineer

Ben’s broad experience across each of our specialist areas, including autoclaves, makes him a unique asset to our engineering team.

Our extended, global service network

One very important extension from the UK servicing team, includes our Roaches certified international partners. Our partners cover some of the farthest regions away from us here in Leeds, England, where regular travel for us is not feasible multiple times a year. 

There are also many nuances in certain regions where our partners have engineers, where it is far suited for us to train them as our own engineers are trained, so that they can cover their own specific region, such as Indonesia or Thailand, and deliver a level of service that is suitable and appropriate for customers in the area.

Liam O’Neill and Ben Seanor with Lazaro, Portugal (Pictured left), Ben with our engineers at Waga Group, Sri Lanka (right).

Conclusion

As our product range integrates more digital features and functions, the work of our service team remains essential. There is still a necessity for bridging knowledge gaps, monitoring performance, and sharing our reputation for reliability with even more engineers around the globe, to ensure our service can be received by everyone, everywhere.

Advanced Dyeing Solutions Ltd marks 25 years of dyeing technology

25 years of Advanced Dyeing Solutions Ltd

Founded in 2001, the business behind the Roaches International brand celebrates 25 years in textile dyeing and finishing solutions.

Advanced Dyeing Solutions Ltd (ADS) proudly marks its 25th anniversary this February, celebrating a quarter‑century of innovation and growth in textile dyeing and testing technologies. Founded in 2001 by Sean O’Neill alongside colleagues Graham Dixon and Philip Cox, the company began its journey at a challenging time for European textile engineering, emerging from the closure of Longclose Dyeing Machinery and quickly establishing itself as a trusted specialist in laboratory dyeing, finishing and testing equipment.

Through the expertise the three of them had acquired from their time at Longclose, they were able to combine their skills and resources to provide a service for customers using dyeing machinery out in the field. It was here that Advanced Dyeing Solutions Ltd formed.

ADS training room

From even the early years, ADS demonstrated year‑on‑year growth, driven by a commitment to provide a high standard of service, as well as producing new equipment for partners across the industry.

A defining milestone arrived in January 2008, when the company acquired the Roaches brand, a respected manufacturer with a 40‑year heritage in laboratory dyeing and textile testing. This strategic step broadened ADS’s capabilities, expanded its global reach and laid the foundation for the strong international brand that we see today.

From Sean

“At the start in 2001, following a redundancy from Longclose Group Ltd, I was 33 years old, had been married for 18 months and had a 4 month old baby boy.  For some crazy reason, myself, Philip and Graham had the dream of running our own company.  How quickly time flies, from a small office at the enterprise centre in Dewsbury in 2001 to where we are today. The baby boy is now 25 and working at the company, and with the support of our colleagues, suppliers, and customers, it has been a roller coaster with many more ups than downs.  I’m looking forward to the future.” – Sean O’Neill, Managing Director

ADS 25 years party pic 1

Looking forwards

The future outlook for both ADS Ltd and the Roaches brand looks exceptionally bright. With Liam O’Neill joining what is now the largest team in the company’s history, there is renewed momentum behind product innovation and market-responsive development. The focus now is on what’s next. What is the next generation of textile machinery for dyeing, finishing, and testing.

The most recent projects, including the Martindale AXYZ and Sentire, have both been met with industry praise, reinforcing the company’s commitment to delivering forward‑thinking solutions that address the challenges of modern textile production. The team is excited to continue this trajectory, pushing boundaries and shaping the future of textile technology.

Watch the recent company video introducing the Roaches brand and ADS Ltd, with Sean and Liam O’Neill.

3 Minute Methods: Martindale sock abrasion

3 Minute Methods textile testing methods made easy header image

Martindale sock abrasion testing

Welcome to 3 Minute Methods, where we aim to teach you a fundamental method in textiles testing, in that’s right, just 3 minutes.

This article follows the EN 13770 Martindale sock abrasion testing method. The structure of this method is based on the ISO 12947-1 abrasion standard, which is considered the benchmark for nearly all textile abrasion tests, though it has some very key differences in several areas, which are detailed here.

What is it?

Unlike ISO 12947-1, EN 13770 recognises that knitted footwear behaves fundamentally differently. Socks are highly elastic, cylindrical, and experience abrasion while stretched over a 3-dimensional form. They undergo flexing and tension patterns entirely different from that of flat fabrics.

It is for this reason why EN 13770 introduces two separate test methods designed specifically to recereate how socks are used. Firstly there is the Modified Martindale Method for Socks, and secondly there is the Abrasion on Leg Forms. For the purposes of this article we will focus only on the first part of this method as it is the only part that relates to testing using the Martindale.

The EN 13770 sock abrasion method, much like in the standard tests, still requires a Martindale tester, fabric specimens, test materials, and a grading environment for final assessments.

Roaches green socks on transparent background

Why it matters

As with any other physical textile test, we are trying to determine how durable the textile product is, to ensure it can fulfil a suitable lifespan as expected by the consumer.

Why it matters to perform this specific sock abrasion test over simply testing according to the standard ISO 12947-1, is because flat testing cannot replicate real or realistic wear for a sock. This type of knitted garment is designed and constructed to contour against the foot, and so a more realistic test must be performed to be able to better replicate real-life conditions, such as walking and playing sports.

How it works

This method retains the core principles of abrasion testing on the Martindale, such as:

  • 16 point Lissajous motion
  • Controlled contact pressure (using a weight)
  • Defined test materials (abradant)

…there are however some key differences. EN 13770 introduces a special abrasion holder assembly, replacing that of the typical holder, and it includes:

  • A needle ring – for gripping the knitted specimen
  • A rubber sphere – with a small flat test surface
  • A holder nut and body – designed to compress the specimen onto the sphere
  • A spring-loaded tightening block – to ensure consistent mounting

The set-up of this head is designed as such so as to create a curved and uniformly tensioned specimen, that replicates the contour and extension seen during real-life wear. Circular samples are taken from the sock specimen, and then mounted into the sock abrasion holders. 

The number of samples per sock/ specimen is a minimum of 4 (per the EN 13770 standard). Two from the heel, and another two from the base of the sock. For additional samples, additional socks will need to be used. 

The Martindale itself is ‘dressed’ as usual with the relevant test materials for abrasion, (wool felt pads and wool abradant as per ISO 12947-1). The other significant difference with this test, is that we are required by the standard to use the 12kPa weight. Once this is set-up, the test is then initiated.

(Pictured below is the sock abrasion test holder in its’s full set-up. In addition, see the suggested sample preparation guide as detailed on a sock).

Sock abrasion kit with 12kPa weight roaches
Martindale sock abrasion specimen diagram Roaches

What you’ll see

The endpoint criteria for the sock abrasion test is assessed from two angles.

Firstly, as we would expect, we would wait to see a hole formation, a breakthrough of the structure. As we are testing knitted specimens, we won’t be seeing a ‘thread break’ as such, as the construction of the fabric typically allows only for a hole formation, triggered by a broken loop/thread.

Secondly, we are looking for areas of thinning. Many cotton and nylon yarns for instance have the propensity to lose spun area and mass, which results in ‘thin’ looking patches where the specimen has been tested.

For inspection, it is detailed in the standard to remove any pills from the specimen with a pair of small, sharp scissors, as the presence of pills can distract from the viewing and eventual grade of the abrasion. The endpoint criteria is to be noted on the report, with either or both the hole formation and/ or thinning where appropriate, and at what rub count the specimen achieved at either point.

Sock abrasion holder tested specimen Roaches

The untested sock fabric specimen (pictured left). On the tested specimen (pictured right), we can see a moderate degree of wear.

Quick takeaway

The Martindale sock abrasion test is a lot more common than you might suspect, and has a great deal of similarity to the standard textile abrasion test, though the EN 13770 is very specifically designed to test knitted socks on a Martindale tester, only.

Want to see the Martindale in action? Request our new brochure, and check out the new Martindale AXYZ video.

Request Martindale AXYZ brochure download

Enter your email address and we will be in contact with more information.

Martindale AXYZ Brochure Request

3 Minute Methods: Martindale pilling testing

3 Minute Methods textile testing methods made easy header image

Martindale pilling testing

Welcome to 3 Minute Methods, where we aim to teach you a fundamental method in textiles testing, in that’s right, just 3 minutes.

Pilling can ruin the look and feel of textiles, and it is one of the primary reasons for a consumer to throw a garment away, with almost 50% of the average persons wardrobe ending up in the bin. It is because of these damaging statistics that manufacturers need a reliable way to predict the propensity that their fabrics and garments have to pilling.

What is it?

Pilling happens when loose fibres on the fabric surface tangle into small balls (pills) during wear or laundering. It’s influenced by fibre strength and type, yarn structure, and fabric construction. The Martindale pilling test accelerates this process under controlled conditions, for us to assess and grade fabrics by their resistance to pilling.

A pilling test such as ISO 12945-2 involves a Martindale tester, fabric specimens (for the top and the base), test materials if required, standard photographic references, and a grading environment for final assessments. 

Green knitwear pilling

Why it matters

This test replicates an accelerated view of the real-life wear of garments and textiles, helping us to predict how fabrics will look after repeated wear. It’s an essential test during quality control for apparel and upholstery, as pilling is one of the first visual signs of wear on most fabrics. Because of this, pilling has a direct correlation with percieved poor quality, or deeming the product to be near the end of its lifespan. 

For premium products and garments, being able to determine how long a product resists pilling, is linked directly to quality and price.

How it works

Circular samples of the test fabric are mounted onto the pilling heads of the Martindale tester. The Martindale itself is ‘dressed’ with a static abradant, which on a pilling test is more often than not the same fabric as what is being tested (face-to-face). The specimen is then rubbed in a small Lissajous pattern for a predetermined number of rubs.

Pilling testing is typically done in set stages, where the test is then stopped and assessed. Assessment is performed after defined rub counts, for example 500, 1,000, 2,000, up to 7,000 rubs.

  • Lissajous movement: 16 rubs = 1 abrasion cycle
  • Test Materials: Reference abradant (140mm, usually the same as the sample piece), wool felt pads (140mm and 90mm)

The number of samples per fabric/ report is a minimum of 4 (per the ISO 12945-2 standard) and this is because there are at least 4 stages of assessment to be undertaken to be able to give an overall grade at the end.

Pictured below is the pilling test holder both stored away and put together ready for testing.

Martindale AXYZ_FirstFrame_1080p-3
Pilling specimen holder set up with weight

Note: The Lissajous motion for pilling is smaller than that for the abrasion test. It is important to understand the difference.

What you’ll see

As with many textile tests, the grading or analysis of the test is a subjective assessment that is done by eye. When your test has stopped at its set increments, we would typically expect to see more pilling as the test progresses. 

A common phenomenon we see with these increments is more pilling at the first increment/s, that appear less as the test goes on. The reason for this is that when the pills form early on, they can become loose and detatch from the specimen, essentially making the results better towards the end of the test. It is for this reason that incremental checks are essential throughout the test, from start to finish.

Grading: Visual comparison against the original sample using a 1–5 scale:

    • 5: No change
    • 4: Slight fuzzing/pills
    • 3: Moderate pilling
    • 2: Distinct pilling
    • 1: Severe pilling

Results gathered from this test include:

  • Frequency of pills in relation to the photographic standards (1-5, 1 being poor, 5 being good)
  • Appearance of fuzzing (visual assessment)

When we talk about grading pilling testing, the higher the photographic standard grade the better. Typically, the highest grade would be a 4/5 as opposed to simply a 5, as most fabrics have some degree of pilling or fuzzing to asses, though on some fabrics where the test has clearly had zero affect, a 5 can be achieved.

Pilling specimen holder green fabric untested
Pilling specimen holder tested green fabric

The untested green fabric specimen (pictured left). On the tested specimen (pictured right), we can see moderate pilling.

Quick takeaway

The Martindale pilling test is a commonly used standard test for materials such as standard garment and upholstery fabrics, nonwovens, luxury textiles and more. Almost every fabric intended for commercial or private use, should have or will have undergone a pilling test on a Martindale tester.

Want to see the Martindale in action? Request our new brochure, and check out the new Martindale AXYZ video.

Request Martindale AXYZ brochure download

Enter your email address and we will be in contact with more information.

Martindale AXYZ Brochure Request